*This is a user-submitted post by Darah Albesa*
The prevalence of CG, and its rapid development in games, movies, and TV has increased general awareness and interest in the field of 3D animation. More and more great animated shorts are raking up considerable recognition on Youtube, Vimeo, and sites like Short of the Week, some of which were created by teams of two or even one dedicated and talented individual. It isn’t a surprise that the idea of a career in 3D animation is crossing a lot of minds these day—it may have even crossed yours!
The term 3D animation is still used to describe the totality of 3D content creation, but you’ll find that creating an animated sequence follows a pipeline that involves skills you probably wouldn’t have thought you’d need to develop, and actually animating something in 3D is only one of those skills. If you’re planning to create an animated short by yourself, you’ll need to know what goes into it.
Planning and organization
Before you get bogged down by the technical aspects of 3D work, you’ll need to get your ideas mapped out in a structured way, allowing yourself to start production knowing you’ll have your story, visual treatment, and the rest of the big picture planned out. Sketch out a rough story board, model sheets for your characters, sets and props, and render out some stills that depict the look and feel of your movie.
Modeling, texturing, and shading

You can’t animate anything you haven’t made yet, so you’ll need some understanding on how to manipulate 3D objects to create the elements you’ll need for your animation. Once you’ve managed to create these elements, you’ll need to learn how to use your 3D software’s repository of materials to give your objects the surface characteristics they need and use images to influence some of these characteristics. If you have a scene with a tree stump for example, you would probably create a cylinder, then add a material on it with the surface properties of a tree bark (how it reacts to light, it’s color, the bumps and creases on its surface, etc.).
Lighting
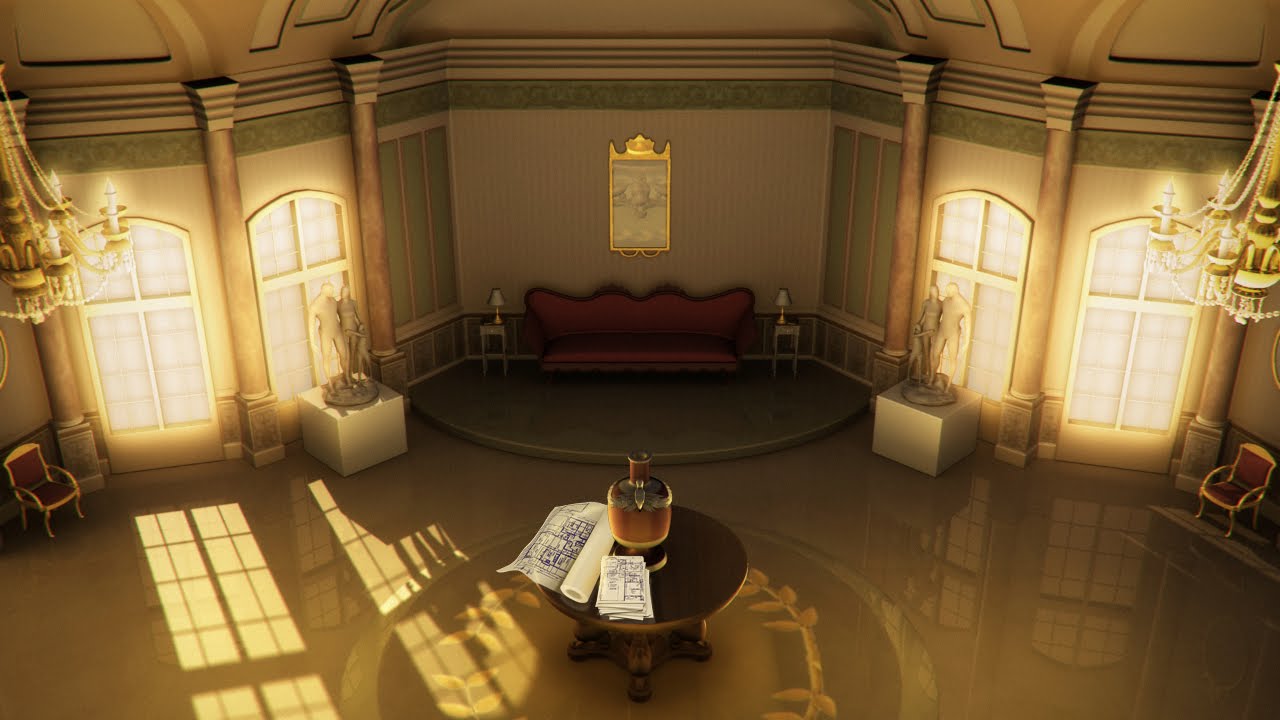
Much like a film maker in the real world, you’ll want to use the lights in your scene to create a mood for your story and highlight details that contribute to the way viewers will perceive your characters and the places they’re in. You’d need to know how lights are configured for various purposes and recreate that setup on your virtual stage
Layout
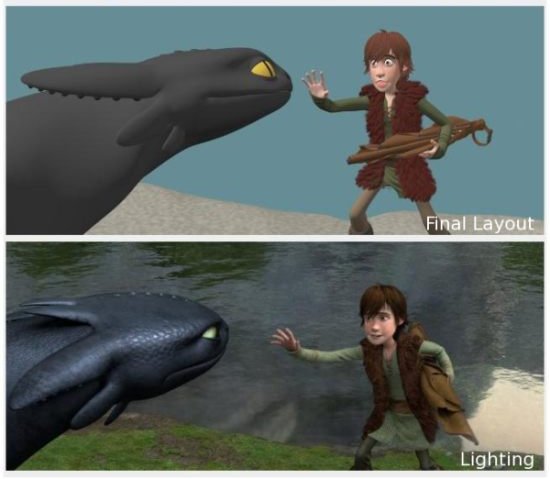
The way you arrange your scene’s elements is also important because this influences whether the viewers are looking at what they need to be looking at and whether everything pans out in a visually-pleasing way.
Rigging
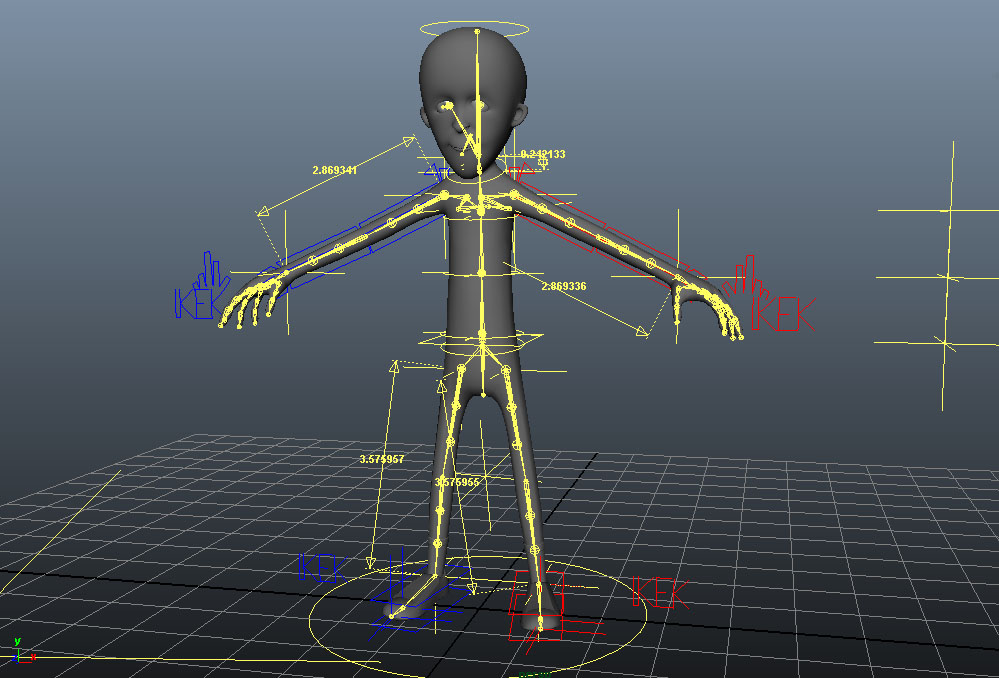
Once you’ve got your characters ready, you’ll need to be able to control them, like you would a puppet, by creating a system of “bones” that allows you to pose your characters.
Animation

At this point, you would pose your rigged characters on certain frames, keeping in mind certain animation principles to breathe an illusion of life into them.
Rendering

The penultimate stage of your 3D animations. Here is where you tell your software to convert your 3D data into a 2D image or movie output. This involves a balancing act between speedy calculation and quality.
Editing and Compositing

In this final stage, you’ll be cutting up your scenes and rearranging them in a way that would best fit your story, as well as adjusting various elements of your rendered outputs to enhance their visual appeal. This involves tweaking your colors, augmenting your lighting, and later on, adjusting each aspect of your final images by rendering in passes, which are essentially elements that constitute your final outputs when put together.
Tools of the Trade
Now that you have a basic idea of what you’re going to need to study, it’s time to find out which software will suit you. To an extent, it doesn’t really matter what software you use, as you alone determine the quality of your work, but each 3D animation software employs a workflow that may suit the needs of a particular kind of user. There are, however, some programs that are more widely used in the industry, and if you were to look for work in a studio or company, it would benefit you to learn one of these programs. Whether they are better than the less-used ones can be subject to heated debate, but if you’re looking to tread the beaten path, you’re probably better off with Autodesk Maya.
Currently, Maya is the most recognized 3D animation suite on the market and the easiest to find work with. You’ll find it also has the most resources online such as animationmentor.com, udemy.com, and of course, Autodesk’s knowledge center: knowledge.autodesk.com. These programs can be quite pricey, but they may offer a free or discounted version for students.
Additionally, rendering that short of yours will probably keep your computer busy for quite some time, and you might want to consider sending your project off to a renderfarm. A renderfarm distributes your frames among a host of machines, allowing you to render frames simultaneously, effectively reducing your waiting time exponentially for a fraction of the cost and headache of building and maintaining a network of computers yourself. If you work with software like Maya, you’re likely to find the best deals out there. A Maya renderfarm is definitely the easiest to find, and most renderfarms offer a starting bonus when you register, so you may be able to get your short rendered for free! You can also check out GarageFarm.net.
Learning 3D animation is generally easier now thanks to all the resources available on the internet, but the learning curve can still be pretty steep. That said, we hope this guide helps you jump start your journey to creating stories with 3D animation!
Was this short guide helpful? Got any tips or advice for budding animators? Sound off below!
Edited by: Kelly Conley
Disclaimer: Rotoscopers was not paid to market or sponsor any products, services, or organizations mentioned in this article.


![[OPINION] 10 Heartwarming Animated Adverts to Watch This Holiday Season](https://www.rotoscopers.com/wp-content/uploads/2021/12/Picture61-350x250.jpg)
